When an appliance breaks, replacing random parts in hopes of fixing the issue is an expensive and frustrating guessing game. Instead, learning how to use a multimeter for appliance repair is the absolute best way to save hundreds of dollars.
A digital multimeter is a handheld diagnostic tool that measures electrical values like voltage, current, and resistance. By testing the individual components inside your broken washer, dryer, or oven, you can pinpoint exactly which part has failed before spending a single dime on replacements. While the dials and numbers might look intimidating at first glance, the process is actually incredibly straightforward. Whether you are dealing with a dead refrigerator or a dryer that refuses to heat, mastering how to use a multimeter for appliance repair will empower you to tackle almost any DIY fix safely and confidently.
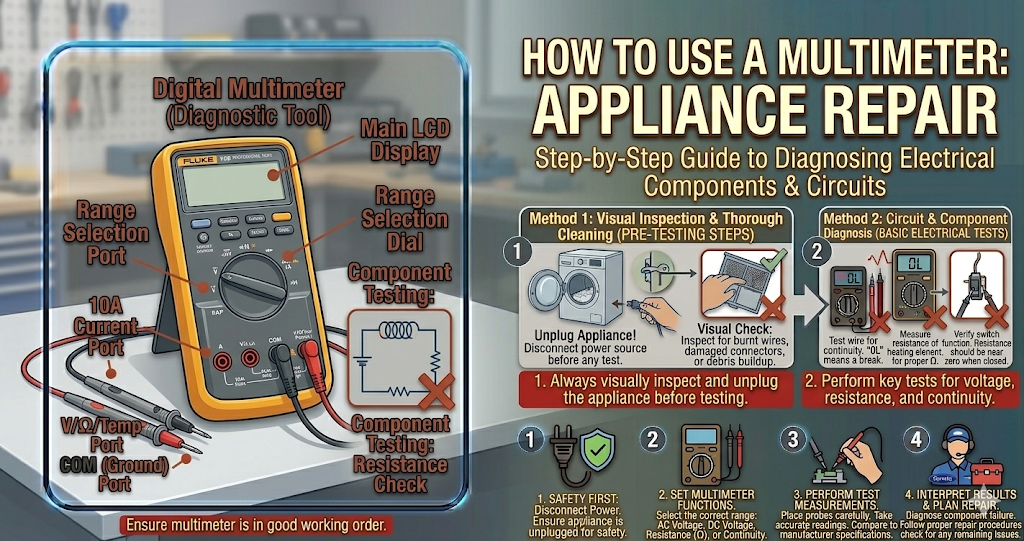
⚠️ SAFETY FIRST: Always unplug your appliance from the wall outlet or turn off its dedicated circuit breaker before touching any internal wires or components to prevent severe electric shock.
The Most Important Setting: Continuity
If you only learn one thing about how to use a multimeter for appliance repair, it should be how to test for electrical continuity. Continuity simply means that a continuous path exists for electricity to flow through a part.
Almost all appliance failures involving heating elements, thermal fuses, and safety switches are caused by a broken electrical path. To test for this:
- Turn the Dial: Set your digital multimeter to the continuity setting. This icon usually looks like a small volume symbol or a series of curved sound waves.
- Test the Probes: Touch the metal tips of the red and black probes together. The screen should read zero (or close to it), and the meter should emit a solid beep. This beep confirms the tool is working correctly.
- Test the Component: Touch one probe to each metal terminal on the part you are testing (like a thermal fuse). If the meter beeps, the part has continuity and is good. If it stays silent, the part is dead and must be replaced.
Testing for Resistance (Ohms)
Another crucial skill when learning how to use a multimeter for appliance repair is measuring resistance, which is measured in Ohms (symbolized by the Greek letter Omega Ω).
You will use this setting to test things like water inlet valve solenoids, oven temperature sensors, and dryer thermistors.
Each specific part has a designated resistance range (usually found in the appliance’s tech sheet). If you test a sensor and the Ohms reading is completely outside the manufacturer’s specified range, the component is faulty and cannot communicate properly with the main control board. Understanding these specific resistance readings is a major part of how to use a multimeter for appliance repair successfully.
Measuring Voltage
While checking for continuity and resistance is done with the appliance unplugged, testing for voltage requires the machine to be plugged in and “live.”
This is the most dangerous aspect of how to use a multimeter for appliance repair, and it should only be attempted if you are entirely comfortable working with live electricity.
You would use the AC Voltage setting (usually marked as a “V” with a wavy line over it) to verify if a wall outlet is actually supplying 120V or 240V, or if a control board is sending the correct power down to a specific motor.
When to call a professional?
While understanding the basics of how to use a multimeter for appliance repair allows you to fix 90% of common household issues, you should never push your comfort zone. If you need to test live 240-volt circuits inside an electric dryer or troubleshoot complex wiring harnesses on a main control board, it is highly recommended to contact a certified local appliance technician to safely complete the diagnostics.